
DIY Arduino based 2D wire bending machine
OVERVIEW
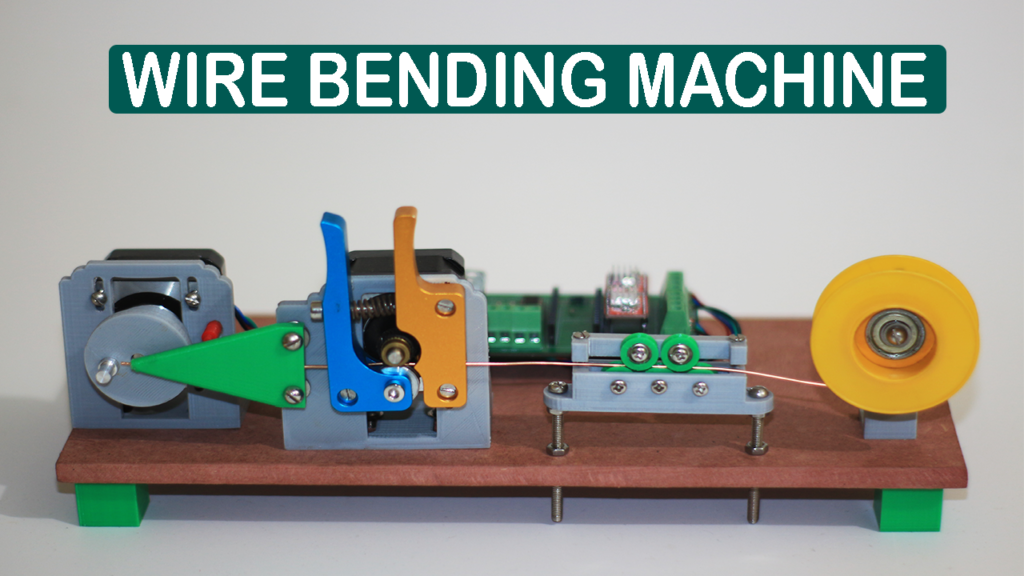
Hello guys here I have build DIY Arduino based 2D wire bending machine, using some stepper motors, and 3D printed parts.
I have use arduino nano for this project, this machine can shape wire in some 2D geometrical figures.
I have write code for some 5 basic shapes like, Triangle, Square, Rectangle, Hexagon & spiral.
What shape and size you want to bend can be define from serial monitor.
In this way it became very flexible and user friendly, don’t need to upload new code for new shape.
More complex shape can also possible, for that we need to write code and upload to arduino.
This DIY Arduino based 2D wire bending machine is fun to build on your own, if you are students this will be good project for your academic project.
VIDEO
Watch the video of DIY Arduino based 2D wire bending machine for complete information about how to build this machine or you can also continue to read the post.
COMPONENT REQUIRED
Followings are the major components require to build DIY Arduino based 2D wire bending machine
Arduino nano — 1 no.
Nema 17 stepper motor — 2 nos.
A4988 stepper driver module — 2 nos.
Filament feeder — 1 nos.
3D printed parts
1 Sqmm brass wire
3mm bearing 693ZZ — 5 nos.
M4 nuts and bolts for mounting
Some of above links as affiliated if you consider to buy item via those links so I'll get some commission, I appreciate your such support
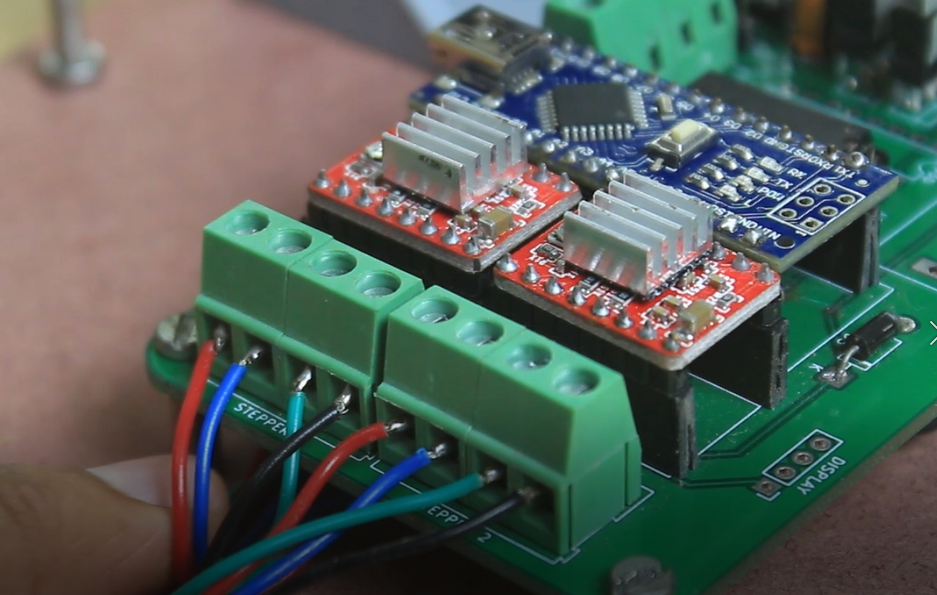
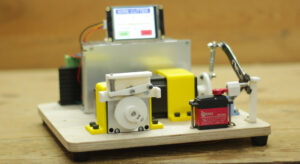
CIRCUIT
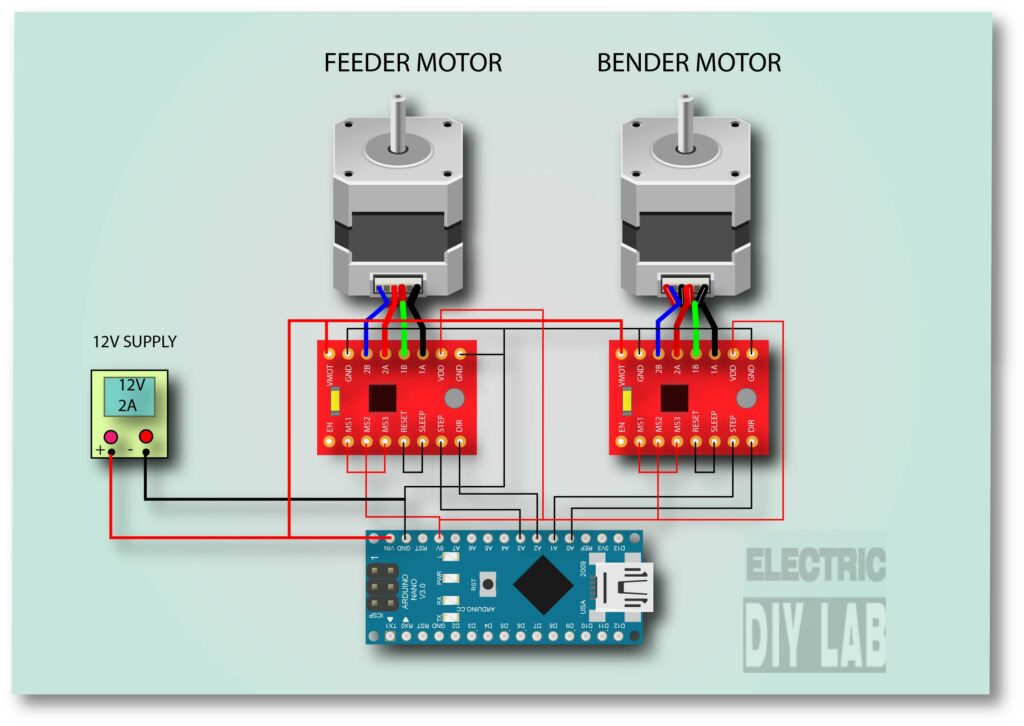
Refer the above circuit diagram to do wiring, I have use 12V 2A external power supply to power arduino and stepper motor.
A4988 driver module is use to operate Nema17 stepper motor, if your stepper motor get unstable or moving some random steps during start up so you can connect step pin and GND pin with 1K ohm resistor.

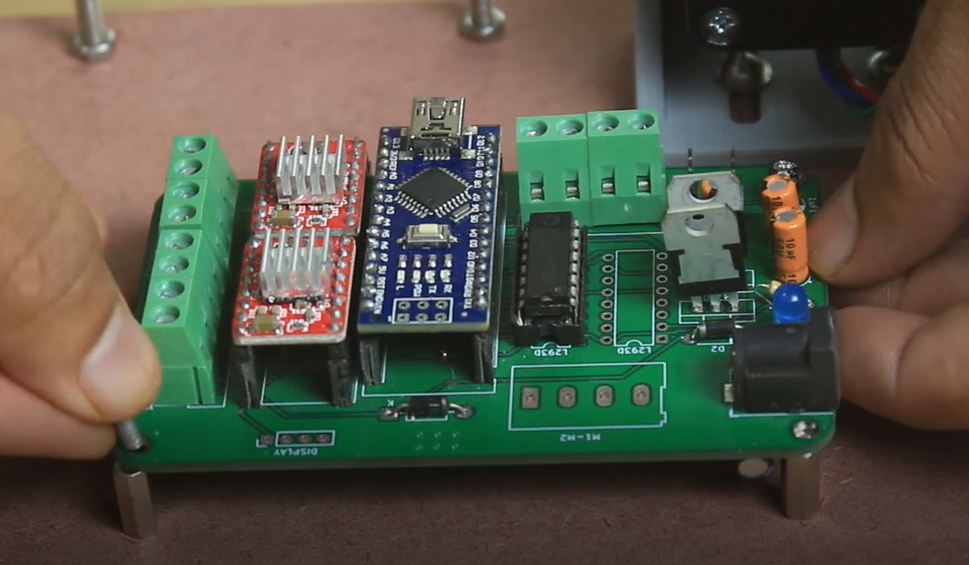
For this project I have a multipurpose PCB which I have ordered from JLCPCB.
So I use this PCB and solder the required components, some of the components on this PCB is not at all used in this project so please ignore them.
You can make you own PCB or can use Breadboard, I prefer to use PCB for good looks and malfunction free work.
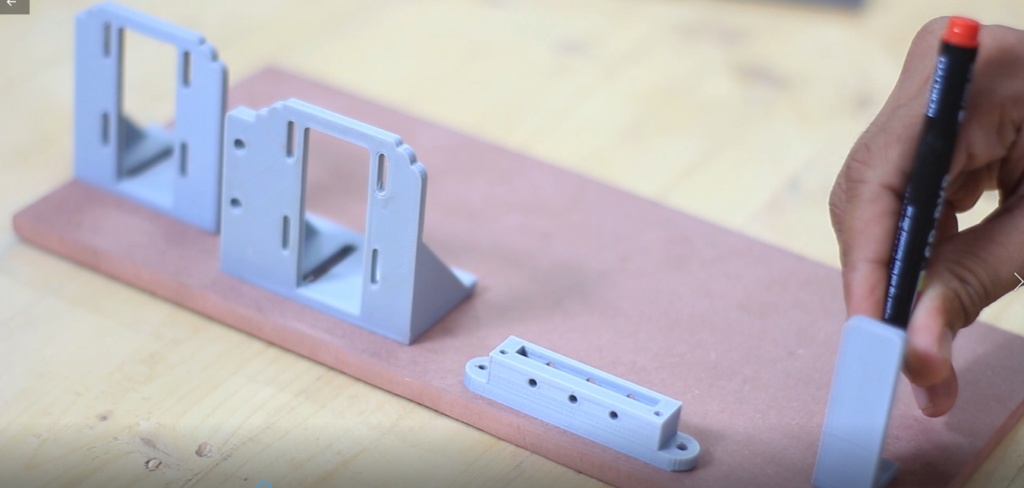
3D FILES
I have uploaded all the required 3D parts at thingiverse
you can download it and print it, I have printed all parts in PLA and 0.15 layer height and 80% infill on tevo terantula 3d printer
WIRE BENDING MACHINE ASSEMBLY

First of all I printed all the required 3D parts in PLA material.
I mount the parts on 8MM mdf board using M4 bolts and nuts.
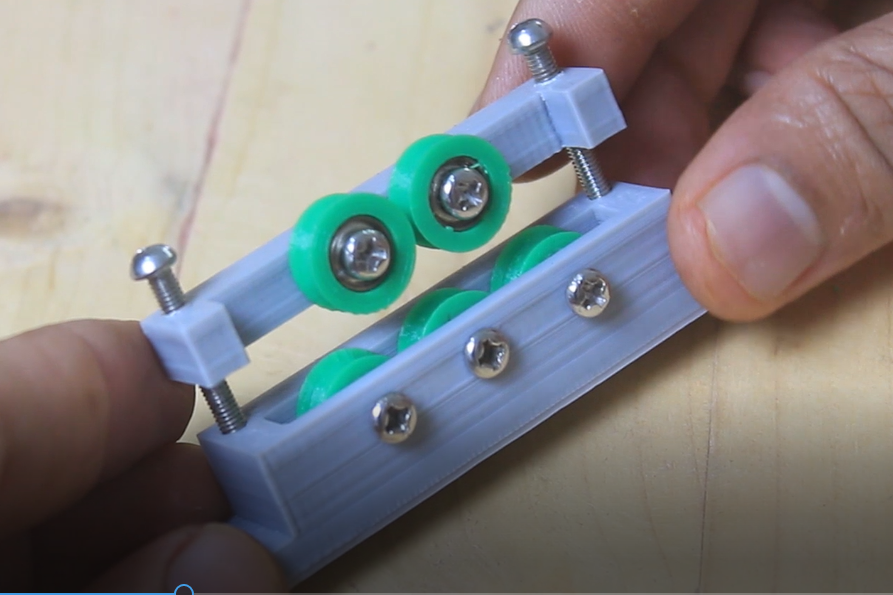
After that I assemble the wire straightener system, I have used 3mm bore diameter bearing 693ZZ
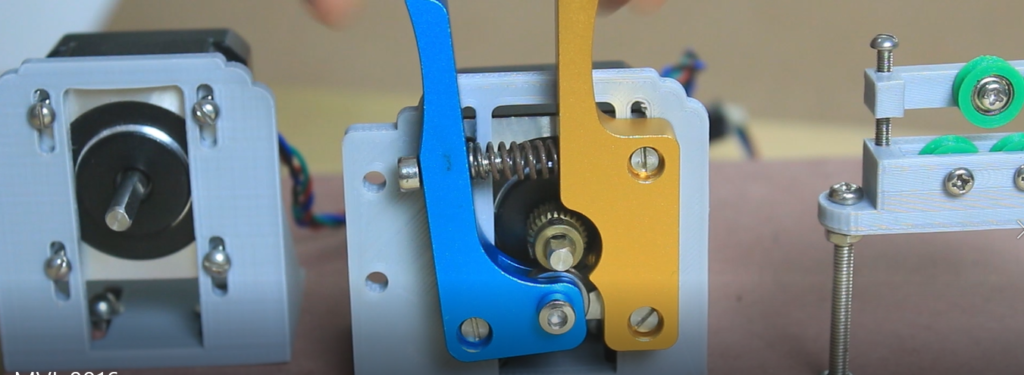
Next I mount both stepper motor, I have used 3D printer filament feeder to feed brass wire in machine.
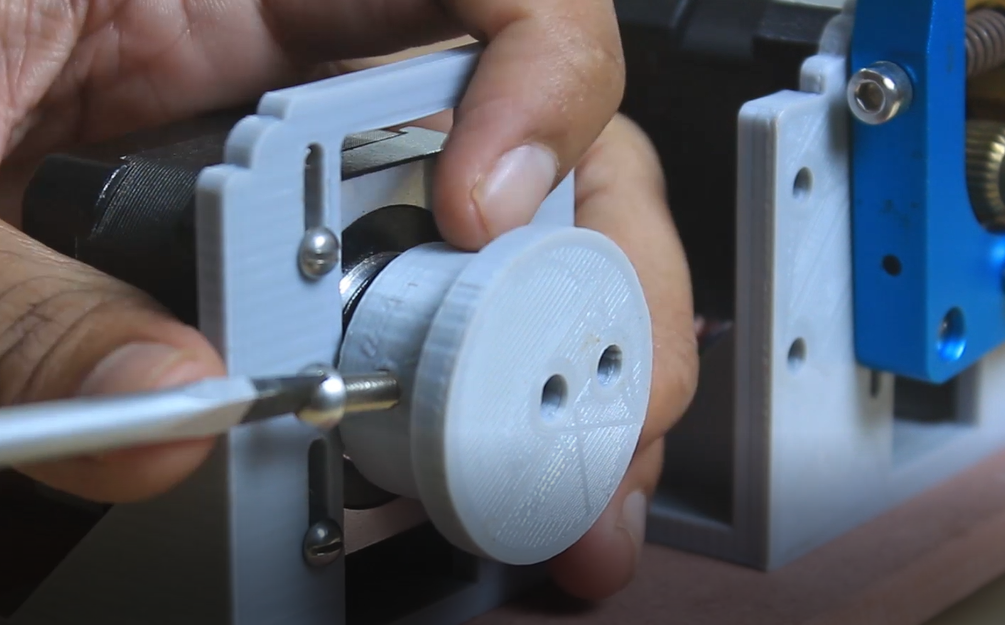
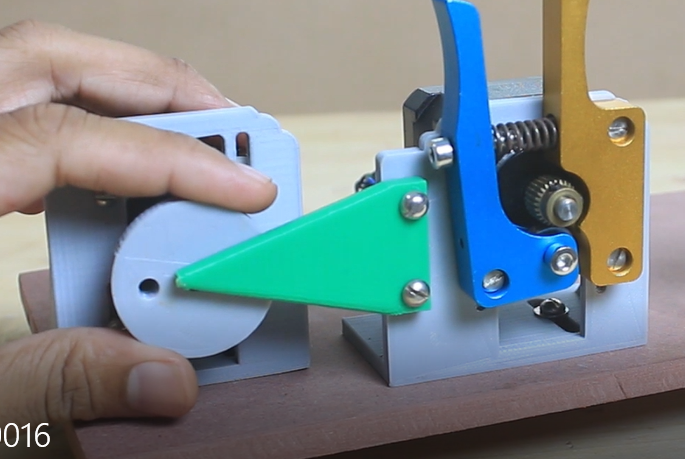
Now I mount the bending arm on the shaft of stepper motor, and next I mount the wire guider on the feeder stepper motor mount.
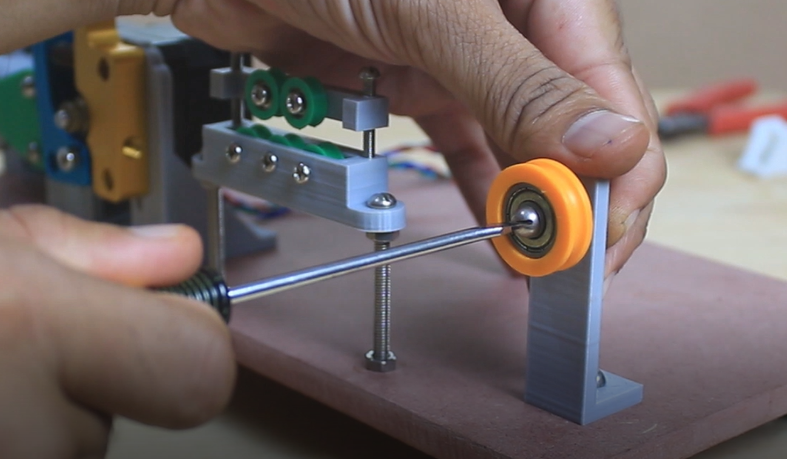
At last I mount a roller bearing to hold the roll of wire, then PCB is mounted on MDF Board and stepper motion is connected to there terminal.
Here machine assembly is almost done so now we can move towards arduino code.
CODE
Let we will see the complete arduino code I will explain most of the coding part.
#include <Arduino.h>
#include "BasicStepperDriver.h"
Here we need to include the stepper library you can download it from here. this library is very straight forward and upto the point what we need that’s way our coding became easy.
#define Feed_step 200
#define Bend_step 200
#define Feed_RPM 80
#define Bend_RPM 30


#define MICROSTEPS 16
int Delay = 50;

#define Bend_DIR 14
#define Bend_STEP 15
#define Feed_DIR 16
#define Feed_STEP 17
int val = 0;
int data = 0;
int a = 0;
int b = 0;
int c = 0;
Here are some variables are defined which is used further in code.
BasicStepperDriver Feed_stepper(Feed_step, Feed_DIR, Feed_STEP);

BasicStepperDriver Bend_stepper(Bend_step, Bend_DIR, Bend_STEP);
Two stepper variables are define hare one is Feed stepper motor and one is Bending stepper motor.
void setup() {
  Serial.begin(9600);
    Feed_stepper.begin(Feed_RPM, MICROSTEPS);
    Bend_stepper.begin(Bend_RPM, MICROSTEPS);
    Serial.println("For Triangle enter (1,Side Length) ");
    Serial.println("For Square enter (2,Side Length) ");
    Serial.println("For Rectangle enter (3,Height,Length) ");
    Serial.println( "For Hexagon enter (4,Side Length) ");
    Serial.println( "For Spring enter (5,Spring Length) ");
    Serial.println( "**Note Enter value without bracket ");
}
Serial communication is initiated at 9600 baud rate in setup function
Information for user is written in setup function this message runs only once.
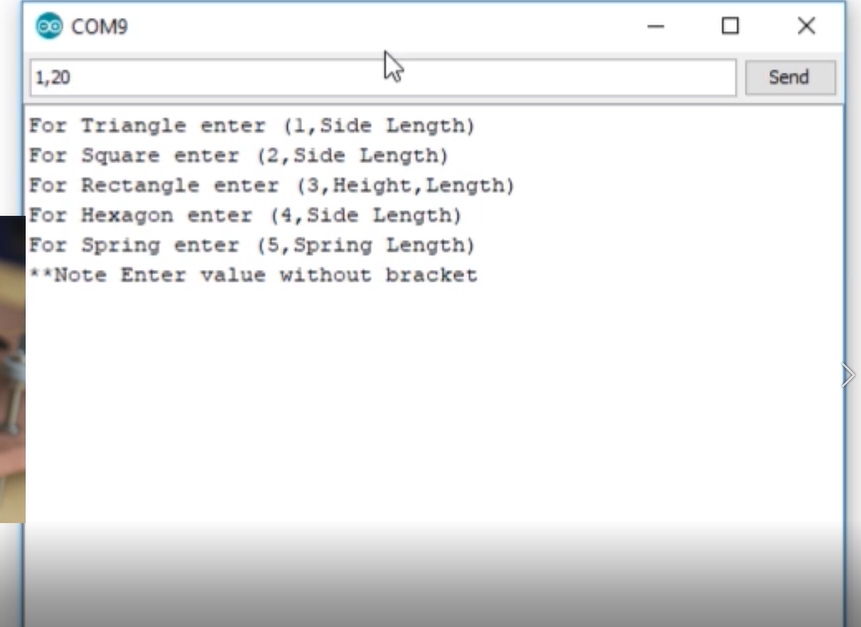
Suppose you need to make a triangle of 20mm side length, open the serial monitor and type 1,40 and press enter.
here 1 means we are selecting triangle from five shape list and 40 is triangle’s side length.
if (Serial.available()>0){

a = Serial.parseInt();
b = Serial.parseInt();
c = Serial.parseInt();
  }
This is the most important part of code, we user input value it divide it in to three parts “a”, “b” & “c” so that it further will be use in code.
Like if you want to make a rectangle of side 10 x 20 mm so you enter 3,10,20
so that a=3, b=10, c=20
if (a == 1){
  Serial.println("  ");
  Serial.print("Making Triangle of side Length ");
  Serial.print(b);
  Serial.println("mm");
for (int x=0; x<3; x++){
  Serial.println("..");
  Feed_stepper.move(FEEDSTEPS*b*MICROSTEPS);
  delay(Delay);
  Bend_stepper.rotate(95);
  delay(Delay);
  Bend_stepper.rotate(-95);
  }
  Feed_stepper.move(FEEDSTEPS*15*MICROSTEPS);
  Serial.println("Finish ");
  a = 0;
  b = 0;
}
This part of code is for triangle if vale if a is one 1 means user wants to made triangle the feeder motor feed wire as per the length required and bender motor moved 95 degree to bend the corner, as a combine result in last we a shape of wire.
further code as just same like this for different code, compete code you can find below.
COMPLETE CODE
#include <Arduino.h>
#include "BasicStepperDriver.h"


#define Feed_step 200
#define Bend_step 200
#define Feed_RPM 80
#define Bend_RPM 30


#define MICROSTEPS 16
int Delay = 50;

#define Bend_DIR 14
#define Bend_STEP 15
#define Feed_DIR 16
#define Feed_STEP 17
int val = 0;
int data = 0;
int a = 0;
int b = 0;
int c = 0;

BasicStepperDriver Feed_stepper(Feed_step, Feed_DIR, Feed_STEP);

BasicStepperDriver Bend_stepper(Bend_step, Bend_DIR, Bend_STEP);


void setup() {
  Serial.begin(9600);
    Feed_stepper.begin(Feed_RPM, MICROSTEPS);
    Bend_stepper.begin(Bend_RPM, MICROSTEPS);
    Serial.println("For Triangle enter (1,Side Length) ");
    Serial.println("For Square enter (2,Side Length) ");
    Serial.println("For Rectangle enter (3,Height,Length) ");
    Serial.println( "For Hexagon enter (4,Side Length) ");
    Serial.println( "For Spring enter (5,Spring Length) ");
    Serial.println( "**Note Enter value without bracket ");
}

void loop() {
  if (Serial.available()>0){

a = Serial.parseInt();
b = Serial.parseInt();
c = Serial.parseInt();
  }


if (a == 1){
  Serial.println("  ");
  Serial.print("Making Triangle of side Length ");
  Serial.print(b);
  Serial.println("mm");
for (int x=0; x<3; x++){
  Serial.println("..");
  Feed_stepper.move(FEEDSTEPS*b*MICROSTEPS);
  delay(Delay);
  Bend_stepper.rotate(95);
  delay(Delay);
  Bend_stepper.rotate(-95);
  }
  Feed_stepper.move(FEEDSTEPS*15*MICROSTEPS);
  Serial.println("Finish ");
  a = 0;
  b = 0;
}


if (a == 2){
  Serial.println("  ");
  Serial.print("Making Square of side Length ");
  Serial.print(b);
  Serial.println("mm");
for (int x=0; x<4; x++){
  Serial.println("..");
  Feed_stepper.move(FEEDSTEPS*b*MICROSTEPS);
  delay(Delay);
  Bend_stepper.rotate(75);
  delay(Delay);
  Bend_stepper.rotate(-75);
  }
  Feed_stepper.move(FEEDSTEPS*15*MICROSTEPS);
  Serial.println("Finish ");
  a = 0;
  b = 0;
}


if (a == 3){
  Serial.println("  ");
  Serial.print("Making Rectangle of  Length & Height ");
  Serial.print(b);
  Serial.print(" & ");
  Serial.print(c);
  Serial.println(" mm");
  Serial.println("..");
 for (int x=0; x<2; x++){
  Feed_stepper.move(FEEDSTEPS*b*MICROSTEPS);
  delay(Delay);
  Bend_stepper.rotate(75);
  delay(Delay);
  Bend_stepper.rotate(-75);
  delay(Delay);
  Feed_stepper.move(FEEDSTEPS*c*MICROSTEPS);
  delay(Delay);
  Bend_stepper.rotate(75);
  delay(Delay);
  Bend_stepper.rotate(-75);
 }
 Feed_stepper.move(FEEDSTEPS*15*MICROSTEPS);
  Serial.println("Finish ");
  a = 0;
  b = 0;
}


if (a == 4){
  Serial.println("  ");
  Serial.print("Making Hexagon of Side Length ");
  Serial.print(b);
  Serial.println("mm");
for (int x=0; x<5; x++){
  Serial.println("..");
  Feed_stepper.move(FEEDSTEPS*b*MICROSTEPS);
  delay(Delay);
  Bend_stepper.rotate(70);
  delay(Delay);
  Bend_stepper.rotate(-70);
  }
  Feed_stepper.move(FEEDSTEPS*15*MICROSTEPS);
  Serial.println("Finish ");

a = 0;
  b = 0;
}


if (a == 5){
  Serial.println("  ");
  Serial.print("Making Spring of Length ");
  Serial.print(b);
  Serial.println("mm");
for (int x=0; x<b*5; x++){
  Serial.println("..");
  Feed_stepper.move(360);
  delay(Delay);
  Bend_stepper.rotate(60);
  delay(Delay);
  Bend_stepper.rotate(-60);
  }
  Feed_stepper.move(FEEDSTEPS*15*MICROSTEPS);
  Serial.println("Finish ");
  a = 0;
  b = 0;
}

}
HOW TO OPERATE WIRE BENDING MACHINE
Connect the power supply to the system, connect arduino and PC with USB cable.
Open the Arduino IDE software launch the serial monitor immediately you will receive a massage to input the data.
suppose you want to make a triangle of 20mm lenght so you need to enter
1,20
The first number before comma is for shape selection and the number after comma are side length.
That’s all for now friends.
If you like this project or have any question regarding, please ask it in the comment section below.


A great project congratulations
Ensure that the RST and SLP pins are pulled up to Vcc DRV8825
I think RST pin & SLP pin are short together
Hi, I’m interested in your project, I’m using Arduino Uno and the DRV8825 driver but it doesn’t work, what can I do to make it work? thanks.
Hi sndeep
can we use this project for 3 mm spring steel wire ?
its not this much powerfull
Hi Sandeep,
I would like to know why would you set the Feedsteps 8? Could you explain what it is?
#define MICROSTEPS 16
#define FEEDSTEPS 8
I would like to know how feeder operate. Currently, I am using DRV8825 and AccelStepper library but the feeder wasn’t work. And it’s working when I’m using yours.
Thank you.
Sorry that is unused variable(feedstep 8) i forget to remove it, you can find actual feedstep at 3rd & 4th line of code.I have not tested it with accelstepper library so its hard to say why not working, while using accelstepp you must need to change default pin configuration that you need to check…
Is the Gerber file for the PCB uploaded somewhere?
Hello Sandeep
I See Your 2 D Weir Bending Machine Really Its Very Nice & Very Good.
Please Can You Send Me All The File In RAR Format ?
If I Need Some Help For Programing Arduino Is It Possible You Help Me Online?
Thanks & Regards
ALI REZA
All of the necessary info. is given here if anything else help needed you can free to ask here…
Please provide me the 3d parts .
WHERE THE PCB FILES THANKS
Hallo die Maschine ist einfach nur super Klasse. Würde die mir gerne nachbauen, aber dazu reicht es bei mir nicht. Leider. Habe zwar einen 3d Drucker, aber mit der Elektronik, da bin ich wohl überfordert.
Kann aber wirklich nur sagen, die Maschine ist total Klasse. Glückwunsch dazu.
Hi, nice rebuild of my original wire bending machine https://hackaday.io/project/166369-wire-bender.
It would be at least polite to mention what is your “creation” based on.
Excelent project.Thank You.
Your welcome
Hi,
simply wow… What if it can take vector drawing and convert it into shape..is it possible?
Currently I have not develop any platform to do so, but yes if some one can develop a processing GUI to upload Vector to create shape then it can possible..