
GRBL CNC Shield + Z Axis servo MIGRBL
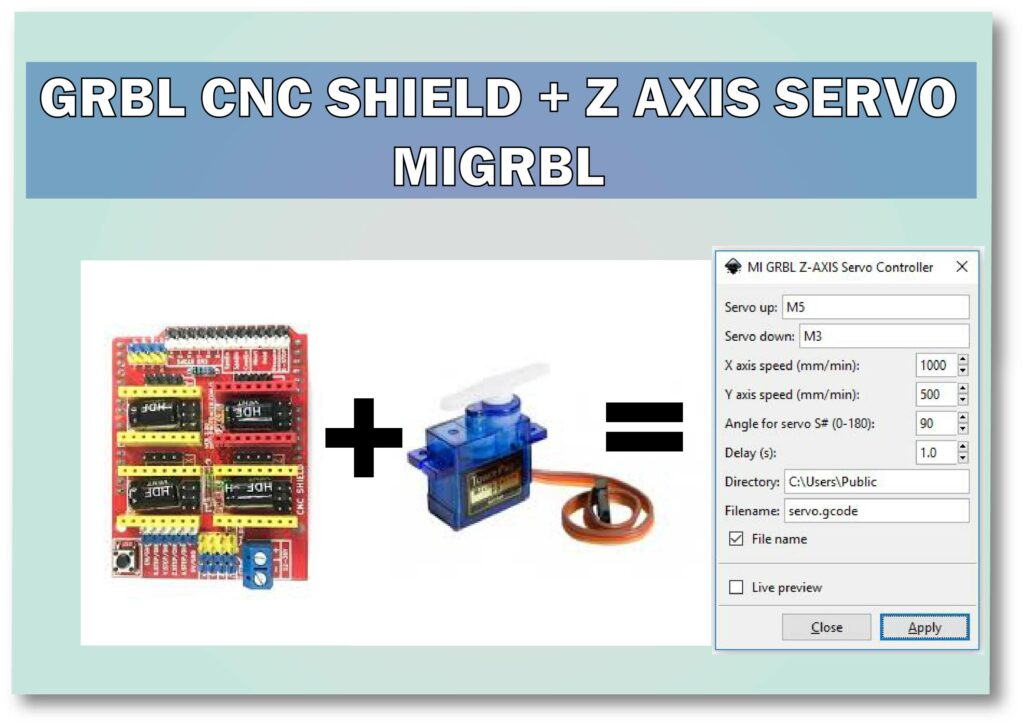
Hello friends, In this post I’ll give a detail tutorial on how we can attached Servo to GRBL CNC shield and how we can generate Z axis servo friendly G-code by using MIGRBL inkscake extension.
In this way we can build a GRBL based CNC pen plotter machine or CNC drawing machine.
OVERVIEW
GRLB is the open source firmware freely available for every one, GRBL is used as firmware for CNC machine.
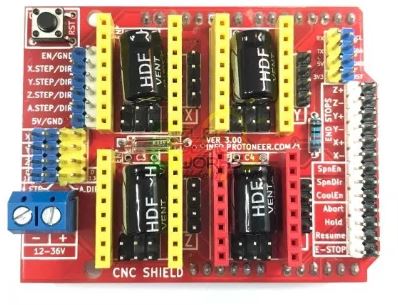
GRBL CNC Shield is used as controller for CNC machine, GRBL shield and GRBL firmware is very best for 3 axis stepper CNC machine.
But when we choose GRBL to build 2.5 axis CNC machines like pen plotter or CNC drawing machine we face a problem that there is not any provision to connect Servo to GRBL CNC shield.
Also default GRBL firmware also not have any facility to control servo motor for Z axis, but we have a hack version of GRBL version which support servo control.
Apart from all of this we also need one software which can convert our design into Z axis servo friendly G-code, For this we have a tool called MIGRBL INKSCAPE EXTENTION.
So below is the solution for how to use Z – azix servo with GRBL CNC shield
List of software and firmware to download
- MIGRBL Firmware (Normal GRBL does’t work download this only)
- Inkscape software 0.48.5 version
- MIGRBL inkscpae extention
As soon as you download all the above tools simply follow the below steps.
1. Uploading MIGRBL to Arduino
First of all unzip the downloaded file.
Now open the MIGRBL folder go to exmple>grblUpload>grblUpload.ino
double click on grblUpload.ino to open the code just simply compile and upload the code to arduino.
Be sure you have selected the correct port and board.
please delete if you already have any previous GRBL folder in Document>arduino>library folder.
Please note that GRBL will only work with arduino uno.
In this way GRBL firmware is successfully uploaded to arduino, next we will see how to connect servo motor to GRBL CNC shield.
2. Connecting Servo motor to GRBL CNC shield
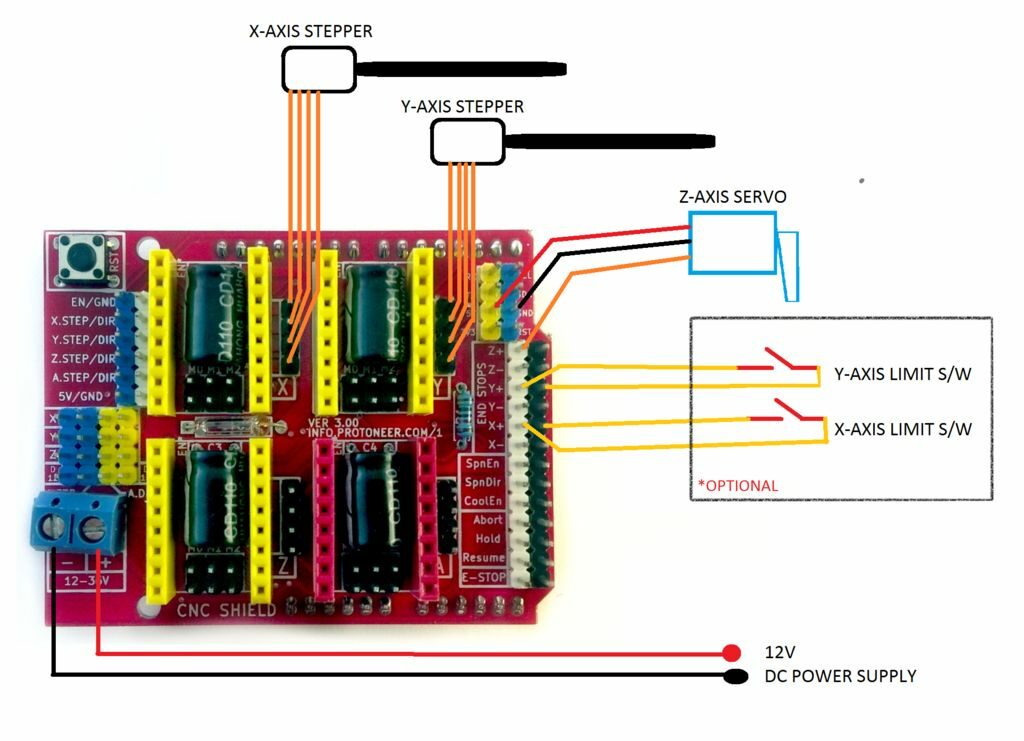
Simply connect the 5V & GND wire of servo motor to 5V and GND pin on CNC shield.
PWM signal wire of servo motor need to connect at Z+ pin GRBL CNC shield.
In this way our wiring for GRBL CNC shield & servo motor.
If you notice a problem like arduino get reset when servo moves so give external 5V DC supply to servo motor.
3. Installing MIGRBL extension in Inkscape software
First of install the download inkscape version 0.48.5 software
Now download the MIGRBL Inkscape extension unzip the downloaded file
open the MIGRBL Inkscape extension folder copy all the four files.
Now got to C:\Program Files (x86)\Inkscape\share\extensions and paste here all the four files.
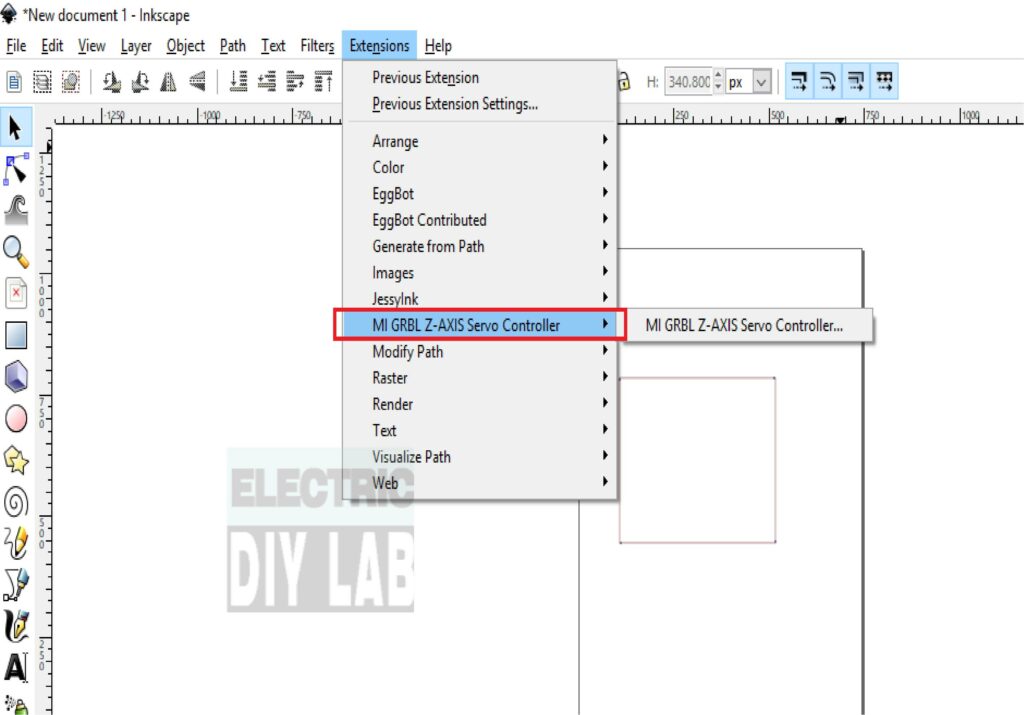
now open the inkscape software got to extension tab you will see here
MI GRBL Z-Axis servo controller this means the extension is installed successfully.
In any case you can’t find the extension at place or you get any error in g-code generation simply download this extension folder and replace with you existing extension folder with this
4. How to generate G-code
All process of installation is done now its time to generate G-code
- Open the Inkscape software
- Go to the file>Document properties
- Set the units to mm
- Set width and height of your plotting area and close the tab
- Now draw the design or drag and drop the image of your choice (If you have drawn something itself in inkscape skip to step 12)
- Now select the image and go to the path>trace bitmap
- Click ok and close the tab
- Now hold click on the image and drag the mouse
- A black and white image will separate from the original image
- Now delete the original image
- Drag the black and white image in center of the frame
- Again goto path>object to path
- Now go to Extensions tab and selec MI GRBL Z-Axis servo controller
- Change the values if needed
- Click on apply to generate the G-code
- Default location where you find the generated G code is C:\Users\Public
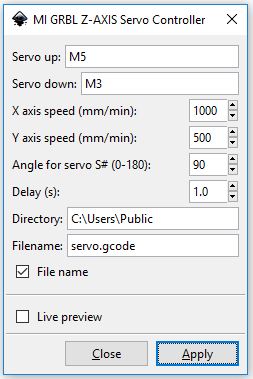
- Servo up: Servo up G-code
- Servo down: Servo down G-code (if servo move in opposite direction swip the M5 and M3 )
- X axis speed: speed of X axis
- Y axis speed: speed of Y axis
- Angle for servo: set the value how much you need to up servo in angle 0 to 180
- Delay: Servo up down delay keep it unchanged
- Directory: the location where G-code file generate
- Filename: default file name
- Live preview: check to see live coordinates in inkscape
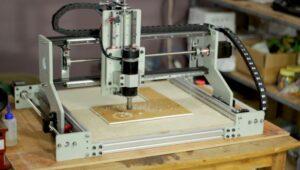
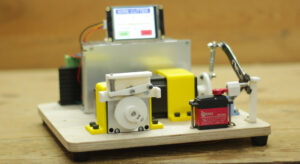
Example of GRBL CNC Shield + Z Axis servo MIGRBL
I hope you find this tutorial helpful for your project, if you have any question please ask in comment box.


hellow~!
I finally made a drawing machine.
But there are two problems.
First, the x and y coordinates are diagonal.
Second, there is noise from the step motor.
What should I do?
Please tell me how.
For those who could not get servo working, solution given by Sandeep is. Using LM7805 voltage regulator works. Also tried a step-down buck-converter to make the solution more permanent. Buck-converter solution also works. Looks like all CNC Shields are not made equal and power for servo is not provided by shield. So, LM7805 or buck-converter comes handy in that situation.
Thanks Sandeep
Thanks
sandeep,
Thank you for this post !!
I would like also to inform you that this tutorial working,
with NANO and CNC shield V4 , repaired according to this
instructable:
http://www.instructables.com/id/Fix-Cloned-Arduino-NANO-CNC-Shield/
Thank you again !! Great and detailed tutorial !! 🙂
Thank you !!!
Does it work also for Incskape 0.92?
I got an error using the plug in:
Traceback (most recent call last):
File “servo.py”, line 3172, in
e.affect()
File “inkex.py”, line 283, in affect
self.effect()
File “servo.py”, line 3156, in effect
self.orientation( self.layers[min(0,len(self.layers)-1)] )
File “servo.py”, line 3085, in orientation
doc_height = inkex.unittouu(self.document.getroot().get(‘height’))
AttributeError: ‘module’ object has no attribute ‘unittouu’
please set the unit PX from mm from document properties before exporting gcode
tengo el mismo error y todo esta en mm ayuda por favor
“” Traceback (most recent call last):
File “servo.py”, line 3172, in
e.affect()
File “inkex.py”, line 289, in affect
self.effect()
File “servo.py”, line 3156, in effect
self.orientation( self.layers[min(0,len(self.layers)-1)] )
File “servo.py”, line 3085, in orientation
doc_height = inkex.unittouu(self.document.getroot().get(‘height’))
AttributeError: ‘module’ object has no attribute ‘unittouu’ “”
change unit from “px” to “mm” in document properties, just before exporting G-code.
Are you realy sure the program doesn’t work with Arduino Mega? Please open the folder cpu_map and ther you will find the files:
cpu_map_atmega328p
cpu_map_atmega2560
The pinage and registers of Atmega are defined there.
And if you open and look the file spindle_control.c , in line 89, 90 and 91:
#ifdef VARIABLE_SPINDLE
// TODO: Install the optional capability for frequency-based output for servos.
#ifdef CPU_MAP_ATMEGA2560
Interesting enough, there are some comments in portuguese language (I’m a brazilian guy) in the file spindle_control.c in the function void spindle_init() look from the line 42:
//spindle_stop();
OCR_REGISTER = 9; // coloca o servo na posicão inicial normal
// OCR_REGISTER = 39; // coloca o servo na posicão inicial invertida
and again in the function void spindle_set_state(uint8_t state, float rpm) from the line 75:
// Volta para a posição inicial
OCR_REGISTER = 9; // Posição normal
// OCR_REGISTER = 39; // Posição invertida
In fact the MIGRBL can be found in this channel :
https://www.youtube.com/watch?v=r4rwlRyKqYU
but having a different name…
Olá,
Estou com problema no servo ele só desce para o angulo zero e fica travado, quando realizo os comandos M3 ele trava em zero e M5 ele destrava mas não sobe o eixo.
Você saberia me responder o porque disto? Tentei ja trocar servo mas a mesma coisa a extensão tbm
Hi, i have a problem in grbl controller that says “buffer size too small, process interrupted” why i have this problem and how i can solve it?
This is not any problem it just a massage from IDE, you can uplode the grbl & ignore the massage
i can send a image of the error to yor gmail? because i cant skip the message and that stop the machine
Grbl compiles and all works fine except servo. Can ANYONE suggest what the problem is. Z axis motor still responds to gcode but no servo movement. Servo is
wired as shown above
Same issue here.
uploaded the firmware to the arduino.
plug motor as indicated, send command and no motion.
Hi Sandeep,
My Z-Axis is not working(Servo motor not at all moving). I have followed all your suggestions.
Breaking my head to resolve this issue from last 15days.
it seems, Pin Z+ not getting signal.
I have changed Servos, CNC shields, Aurdino boards also. But no use.
Could you please help me to resolve this issue.
BR/Sandeep
Hi Sir
I am late commer.
Sorry to disturb you. Could you please tell me how can I download MI Inscape Extention. The link is not working.
Regards
Sen
Link is working fine
Hola, buenas tardes. Segui todos los pasos y no logro hacer que el servomotor se mueva. Usted podría decirme cual sería el problema? Porque todo el resto funciona perfectamente, excepto el servomotor.
GRACIAS!!!
9V is ok!
It is not recommended as per data sheet , but I personally run it on 9V several times without any trouble..
OK! I’ll see how the engine will work.
Why does the motor p rotate 1/4 turn when setting 2048 steps?
Looks you are using A4988 driver please check you microstep configuration
Yes – I use A4988. In the GRBL configuration I have set 2048 steps
How to connect the 28BYJ-48 unipolar stepper motor to the A4988 stepstick? The motor has 5 pins and the stepstick has 4 inputs.
I think you are talking about to convert unipolar to bipolar stepper motor
for that watch this
https://www.youtube.com/watch?v=FLJGCZslOcM
I did as in the movie. The engine gets hot.
Please note that the rated voltage for 28byj48 stepper motor is 5VDC it can extended upto 9VDC motors get little hot its ok, if you can able to touch motor for 5 seconds then its not that hot …
Hi
I followed all steps to create G code but when I want to send it via univresal g code sender it says the file is empty and sometime it have error
and if its possible upload the g code for testing
You gcode file may be empty
it’s not
when I open it by note pad it have this:
M5
G90
G21
G1 F2000
G1 X31.5748 Y30.0769
M3 S90
G4 P1
G1 F2000.000000
G1 X31.5748 Y33.4808
G1 X34.5817 Y33.4808
G1 X34.5817 Y30.0769
G1 X31.5748 Y30.0769
M5
G4 P1
G1 F2000
G1 X31.5748 Y9.3738
M3 S90
G4 P1
G1 F2000.000000
G1 X31.5748 Y26.8374
G1 X34.5817 Y26.8374
G1 X34.5817 Y9.3738
G1 X31.5748 Y9.3738
M5
G4 P1
G1 F2000
G1 X6.6012 Y9.3738
M3 S90
G4 P1
G1 F2000.000000
G1 X16.0728 Y21.9371
G1 X7.7204 Y33.4808
G1 X11.5792 Y33.4808
G1 X16.0227 Y27.2978
G2 X17.3722 Y25.3503 I-52.0521 J-37.5103
G2 X17.9938 Y24.3379 I-13.4227 J-8.9388
G2 X18.8491 Y25.6277 I22.6974 J-14.1225
G2 X19.9316 Y27.0841 I30.0285 J-21.1888
G1 X24.8595 Y33.4808
G1 X28.3842 Y33.4808
G1 X19.7813 Y22.118
G1 X29.0524 Y9.3738
G1 X25.0433 Y9.3738
G1 X18.8792 Y17.9741
G2 X18.3707 Y18.7203 I29.7407 J20.8139
G2 X17.8101 Y19.5856 I39.4373 J26.1632
G2 X16.9804 Y18.2775 I-76.1046 J47.3535
G2 X16.6408 Y17.7767 I-11.4842 J7.424
G1 X10.4934 Y9.3738
G1 X6.6012 Y9.3738
M5
G4 P1
G1 F2000
G1 X0 Y0
but when I browse it to the program it says it’s empty
Gcode looks ok do one thing download Camotic gcode simulator from web and simulate you gcode if it’s proceed fine then problem is with not gcode do this and tell me the result
Congratulations especially for MIGRBL.
It works really.
I suppose that it should work also with Arduino Nano, Pro mini and other based on Atmega 328P am I right?
What do You thing of using pair of L293D motor drivers for very low budget plotters based on mechanical parts od scrap CD/DVD Roms?
I am working for such exercise for school elecronics / Ham Radio club as valuable arduino exercise.
Yes it can work with any Atmega 328P CPU, off course you cannot able to use grbl shield if using nano.
for L293D you need adafruit motor driver shield and makerboat g-code extension for inkscape, and gctrl processing GUI, you cannot use GRBL in this case.
thanks for your adviced, i will try
hello mr sandeep
why after send command M3 S90 for move servo, my cnc stop. if i am try to re open port error connection. i am used universal Gcode sender V1.0.9
iam need your advice
M3 S90 is command to operates Z axis servo
This also heppens to me many times, so i figured out that when servo motor operates it drain more amps from arduino and reset the arduino due to over current, so I supply 5VDC to servo motor via LM7805 IC, I tap 12VDC from the main supply of GRBL CNC shield to LM7805 and supply 5V to servo motor in this way arduino free from load of this servo, you can do wiring as per the image shown in the link
https://ibb.co/h8fhg6D
Can you make 1 video on this??
sorry smit….
Yes need to short all gnd of different power source
Sir can I send g code using python to Arduino after uploading GRBL firmware to the Arduino… If yes then how??…
Please help this will be a great help to my project….
I hope you will give right solution to my query…
Thank you
What are the dimensions of the X, Y rail rods?
hello sir Inkscape Mac OS How to setting MI GRBL Extension
hello sir ,every thing is working well except servo motor.its not working at all after all above procedure .Also i applied external power to servo.Now kindly help me
Hola, a mi me ocurre lo mismo. Pudiste encontrar el problema?
Si es así, te agradecería mucho que me dijeras como hiciste para hacerlo funcionar.
Gracias!!
Hola, me gustaría saber cual es el programa en Arduino que hay que cargar para que comience a realizar las impresiones (dibujos). O eso lo ha de realizar un programa aparte?
First you need to upload GRBL firmware to arduino, then after need to send G-code to arduino to draw image via any G-code sender software..
Sir I need to know that can I send the g code using python to Arduino after uploading GRBL firmware to Arduino.
If yes then how ??
Please help me it will be great help fo my project……..
I hope you will give me the right solution for my query……
How much volt of power supply should be given to Cnc shield???
5,9or12
Can you print me some 3d printed parts??
GRBL CNC shield can work on 12-36V DC
plz help
can you give me watsapp
Everything became fine
But when I sent Gicode via universal g-code sender Give me this message”Error expected command letter
can you help me with a video because my English is not very good
thanks
We are happy to help you, if you can please send some screen shot of the error it would very helpful to get some solution …
Everything became fine
But when I sent Gicode via universal g-code sender Give me this message”Error expected command letter
can you help me with a video because my is not very good
thanks
SIR,
THE 3D PRINTED CLAMPS PLEASE GIVE INFORMATION ABOUT THERE SIZE AND DIMENSIONS. AND WHERE TO GET THEM.
PLEASE
Thank you
which 3D parts you are talking about ?
Do we save the file in the form of G-code and end up
Your answer concerns me
thank you very much
Yes the file is save in form of G-CODE
Can this will work with arduino megao ?
No this’ll works only with arduino UNO
please add some information in regards of size and dimension of 3d printed parts.